Double Wide Driveway...
Double the pain to shovel.
I used to like winter.
Used to.
===========================
If you're looking at a house with a double wide driveway, its convenient for most of the year.
My driveway is "shared" with the neighbor as we're in a semi detached home. This means I have to shovel all of my snow onto the grass on the one side of the driveway. It's literally twice as much work.
I'll be saving for a snow blower. :-(
or at minimum one of those giant scoop shovels you can drag around.
Friday, December 28, 2012
Monday, December 24, 2012
The Cost of Lights
So, I was at Costco, and there was a sale on LED lights.
I'm a geek. I am to LED's like a moth is to a flame. They're efficient, They're quick to react (so... they're efficient), they run cool (again... meaning they're efficient) and they are also new and shiny and I impulsively bought them, without doing any research, because... well they were on sale.
My House as a TON of GU-10 Socket light fixtures.
They are 110 Volt fixtures with 3-4 Halogen "Projector" bulbs in them.
These bulbs run HOT, don't last very long, and are high wattage for their size.
I chose to replace all these with the LED's. It meant leaving Costco with over 140 bucks in LED lights.
It seemed like a good idea at the time!
I had also gotten my first "lunker" of a hydro bill.
(Yes, Sometimes my spending habits make no sense - Big bill I have to pay = sink money into LED light bulbs?)
So, Lets figure out how stupid I really was.
Here will be my calculations on how much you can save/spend on various forms of lighting.
First a 40 second intro to Lighting: (more if you are a slow reader)
There are 5 kinds of lighting that are commonly used in house holds.
Incandescent - Thomas Edison style - Tungsten filament, burning so hot it glows. Standard for the last century until the last decade or so. 40-60-100 watt bulbs are standard
Standard Socket Compact Florescent - Ballast built into Bulb, Direct replacement for most incandescent bulbs. 7-8 watt replaced 40. 13-14 watt replaces 60. 23-27 watt replaces 100 watt. Variety of "color" temperature, but effects useful light output. Bulbs also decay and lose up to 40% of light output with age.
Florescent Tubes - In houses, used in workshops, laundry rooms and sometimes kitchens. Bright, uniform light reduces shadows. 32-40 watts per bulb, usually 2-4 in a fixture. Somewhat harsh light, and is avoided in "living" area
Halogen Lights - Small, High output bulbs, also used in pot lights, Under cabinet lights, some desk lamps. They run hot, and burn out frequently, but are great when small size matters. 20 watt For desklamps/cabinet lighting, 35-50 watts for flood or spotlight type fixtures, 100-150 watts for outdoor / some bathroom fixtures
LED Lights - Popularized probably by Christmas lights, only in the last few years has the technology been developed to get this at a price range people will consider buying to replace normal house bulbs. More efficient than all of the other light types, they're also more expensive for the light output produced.
Heres a handy chart for Light output vs Energy Usage: (shamelessly stolen from wikipedia)
So - Lets find out how much money I wasted:
Note: the way I will explain this wont' make sense from a science perspective, but WILL get you the desired result in energy consumption.
To calculate the cost, you need to figure out how many watts (Watt Hours) you use.
Basement - 3 Bulbs, 5 hours a day = 750 Watts
Kitchen - 3 Bulbs, 4 hours a day = 600 Watts
Breakfast bar - 3 bulbs, 6 hours a day = 900 Watts
Bathroom - 3 Bulbs, 1.5 Hours a day = 225 Watts
Total daily usage: 1475 Watt Hours, or 1.475kWh
My Blended Usage Rate (an average of what I pay per kWh, based on time of usage peak/low rates) is about 8.3 cents per kWh (I pay 12 cents at "peak" time, 6.9 cents at night/weekends)
So, in One day, these bulbs cost me an average of 12.24 cents.
Over a year, that means $44.68 in energy us used to run these bulbs.
The LED bulbs use just 6 watts, or just 12% of what the halogens used, so all I have to do is take 12% of the total to figure out the cost of running them for a year:
44.68*0.12 = $5.36 per year.
A savings of $39.32 a year.
This means these bulbs will pay themselves off in 3.5 years in energy costs alone.
Now, there are some tangible and intangible benefits over the next 5 years of ownership:
Overall... I'd call it a "smart" decision in hindsight.
Within the length of their lifetime, they will pay themselves off two to three times.
I am also impressed with their light output, the color and "crispness" of their light, and overall aesthetics I'm not a huge fan of CFL (twisty) bulbs, but Use them where I can over incandescent, just for the energy savings.
When We first bought the house, almost every fixture had 60 and 100 watt incandescent bulbs (mixed randomly)
For shits and giggles one day in September I turned on all the lights for an hour, and Documented that the house used 4.4kWh. I turned off all the lights for an hour afterwards, and the house consumed 0.9kWh This tells me I have 3100 watts worth of Light! I know for a fact now I've reduced that by about 1000 watts via LED and CFL lights, so Once I'm done swapping out all the bulbs, I'll do the test again (after getting a "baseline" hour) and see what the difference is! I'll do this in a few weeks.
So my official recommendation:
If you don't mind the "light" that comes from CFL bulbs, they are the cheaper way to get energy efficiency. If you have some unique/unusual fixtures that use the two pin GU-10 sockets, LED may be the only way for you to go green - And if it is, I HIGHLY recommend it. They're great little bulbs!
I'm a geek. I am to LED's like a moth is to a flame. They're efficient, They're quick to react (so... they're efficient), they run cool (again... meaning they're efficient) and they are also new and shiny and I impulsively bought them, without doing any research, because... well they were on sale.
 |
| My Light bulbs used to look like this... |
My House as a TON of GU-10 Socket light fixtures.
They are 110 Volt fixtures with 3-4 Halogen "Projector" bulbs in them.
These bulbs run HOT, don't last very long, and are high wattage for their size.
I chose to replace all these with the LED's. It meant leaving Costco with over 140 bucks in LED lights.
It seemed like a good idea at the time!
I had also gotten my first "lunker" of a hydro bill.
(Yes, Sometimes my spending habits make no sense - Big bill I have to pay = sink money into LED light bulbs?)
So, Lets figure out how stupid I really was.
Here will be my calculations on how much you can save/spend on various forms of lighting.
First a 40 second intro to Lighting: (more if you are a slow reader)
There are 5 kinds of lighting that are commonly used in house holds.
Incandescent - Thomas Edison style - Tungsten filament, burning so hot it glows. Standard for the last century until the last decade or so. 40-60-100 watt bulbs are standard
Standard Socket Compact Florescent - Ballast built into Bulb, Direct replacement for most incandescent bulbs. 7-8 watt replaced 40. 13-14 watt replaces 60. 23-27 watt replaces 100 watt. Variety of "color" temperature, but effects useful light output. Bulbs also decay and lose up to 40% of light output with age.
Florescent Tubes - In houses, used in workshops, laundry rooms and sometimes kitchens. Bright, uniform light reduces shadows. 32-40 watts per bulb, usually 2-4 in a fixture. Somewhat harsh light, and is avoided in "living" area
Halogen Lights - Small, High output bulbs, also used in pot lights, Under cabinet lights, some desk lamps. They run hot, and burn out frequently, but are great when small size matters. 20 watt For desklamps/cabinet lighting, 35-50 watts for flood or spotlight type fixtures, 100-150 watts for outdoor / some bathroom fixtures
LED Lights - Popularized probably by Christmas lights, only in the last few years has the technology been developed to get this at a price range people will consider buying to replace normal house bulbs. More efficient than all of the other light types, they're also more expensive for the light output produced.
Heres a handy chart for Light output vs Energy Usage: (shamelessly stolen from wikipedia)
| Minimum light output (lumens) | Electrical power consumption (Watts) | ||
|---|---|---|---|
| Incandescent | Compact fluorescent | LED | |
| 450 | 40 | 9–13 | 4-9 |
| 800 | 60 | 13–15 | 10-15 |
| 1,100 | 75 | 18–25 | Not available |
| 1,600 | 100 | 23–30 | Not available |
| 2,600 | 150 | 30–52 | Not available |
So - Lets find out how much money I wasted:
Note: the way I will explain this wont' make sense from a science perspective, but WILL get you the desired result in energy consumption.
To calculate the cost, you need to figure out how many watts (Watt Hours) you use.
Basement - 3 Bulbs, 5 hours a day = 750 Watts
Kitchen - 3 Bulbs, 4 hours a day = 600 Watts
Breakfast bar - 3 bulbs, 6 hours a day = 900 Watts
Bathroom - 3 Bulbs, 1.5 Hours a day = 225 Watts
Total daily usage: 1475 Watt Hours, or 1.475kWh
My Blended Usage Rate (an average of what I pay per kWh, based on time of usage peak/low rates) is about 8.3 cents per kWh (I pay 12 cents at "peak" time, 6.9 cents at night/weekends)
So, in One day, these bulbs cost me an average of 12.24 cents.
Over a year, that means $44.68 in energy us used to run these bulbs.
The LED bulbs use just 6 watts, or just 12% of what the halogens used, so all I have to do is take 12% of the total to figure out the cost of running them for a year:
44.68*0.12 = $5.36 per year.
A savings of $39.32 a year.
This means these bulbs will pay themselves off in 3.5 years in energy costs alone.
Now, there are some tangible and intangible benefits over the next 5 years of ownership:
- The Halogen bulbs burn out quickly - I had 2 burn out in 3 months. Normalize that a bit (I might have been unlucky) and lets call it 5 a year. That's 20 dollars a year in bulbs. The LED's will last a lot longer, (probably longer than I will own the house - 5+ years. The bulbs have a 3 year warranty to boot. so thats now $59.32 a year savings.
- The halogens were HOT. So much so, they'd heat the back of my head when i was cooking in the kitchen. They'd also heat the basement up a bit. So the AC was turned up to counteract that. Its hard to put a dollar value on it, But I'm assuming the opposite effect occurs in winter - Gas consumption vs Electric - we'll call it a wash - But it was DEFINITELY noticeable in the fact that the kitchen has cooled off since ditching 300 watts of lights!
Overall... I'd call it a "smart" decision in hindsight.
Within the length of their lifetime, they will pay themselves off two to three times.
I am also impressed with their light output, the color and "crispness" of their light, and overall aesthetics I'm not a huge fan of CFL (twisty) bulbs, but Use them where I can over incandescent, just for the energy savings.
When We first bought the house, almost every fixture had 60 and 100 watt incandescent bulbs (mixed randomly)
For shits and giggles one day in September I turned on all the lights for an hour, and Documented that the house used 4.4kWh. I turned off all the lights for an hour afterwards, and the house consumed 0.9kWh This tells me I have 3100 watts worth of Light! I know for a fact now I've reduced that by about 1000 watts via LED and CFL lights, so Once I'm done swapping out all the bulbs, I'll do the test again (after getting a "baseline" hour) and see what the difference is! I'll do this in a few weeks.
So my official recommendation:
If you don't mind the "light" that comes from CFL bulbs, they are the cheaper way to get energy efficiency. If you have some unique/unusual fixtures that use the two pin GU-10 sockets, LED may be the only way for you to go green - And if it is, I HIGHLY recommend it. They're great little bulbs!
Friday, December 21, 2012
The First Fire... (in the fireplace)
So We were lucky enough to buy a house that has a Wood Fireplace in the basement Family Room.
There are a few pros, and a few cons to this:
Pros:
Its a nice looking, Painted Brick Fireplace and it adds to the rooms cosyness.
In A Power Outage, we have a way to keep our house and our pipes from freezing
Chestnuts roasting on an open fire. (need I say more?)
My odds of surviving a zombie apocolypse are slightly better.
Cons:
Insurance isn't a fan of these and you'll pay a dollar or two more a month as a result
Some minor heat loss/drafts when not in use
Storing wood is a pain. Bringing wood into your house can also bring pests/bugs
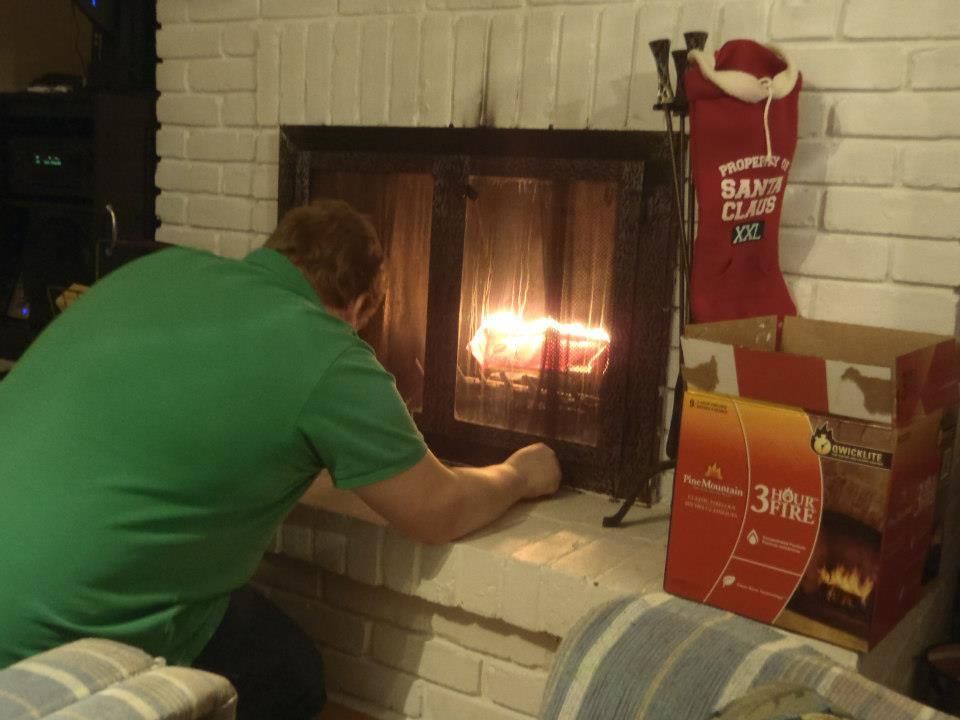
So, I Megan and I actually committed to staying up and watching TV until 11, so we decided to burn one of our 3 hour logs I bought before a big storm coming our way (they warned of blackouts... I figured that was as good as excuse as any to spend money)
My Father in law told me that I should burn some news paper to warm up the chimney.
I assumed - hey, the 3 Hour log is covered in paper - Should be good enough! *shrugs*
So I proceed to Open the Flu (a lever that opens up a flap to connect your chimney to the house) Light the paper, and almost immediately panic.
It was like... a Wall of smoke, billowing into my house. Panic, Running around, "do we have a bucket?!?" ensued, then an eternity later (about 10-15 seconds) I decided my best course of action would be to close the glass doors and the vent at the bottom.
Once the flame got going, things settled down. Half a can of febreeze in the basement and the smoke smell was sufficiently masked.
Should have listened to the Father in Law. (wow, did I just say that?)
Lesson number 1: Hot air rises.
It was a cold, windy day... and Cold air sinks. That cold air came rushing into my basement via the chimney blowing the flame/smoke into our
Thankfully, My knee jerk reaction of closing the glass doors helped a little bit. It reduced the amount of wind rushing down through the fireplace into my house enough that the flame was able to heat the air enough to get some hot air rising - Convection. Once this occurs, Smoke goes out the chimney, rather than billowing into my basement.
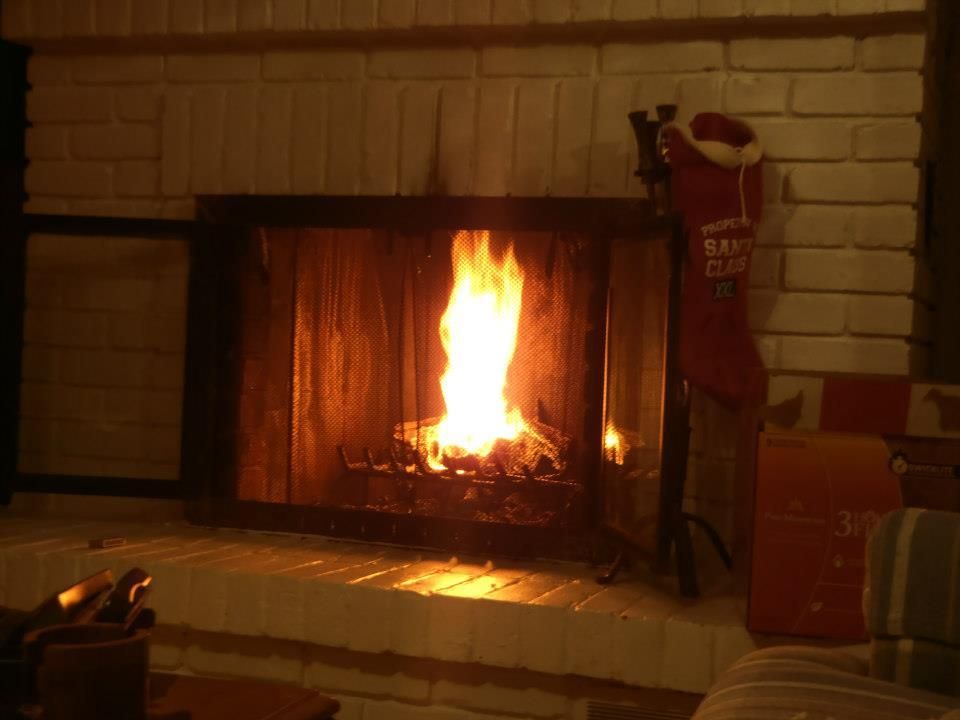
 FYI: the soot mark above the fireplace was there before I started the fire...
"3 Hour Logs"
A warning about "three hour logs" and such - They're basically sawdust held together with wax. They don't make a huge flame - But if you poke them while they're burning, they'll desintigrate into a fireball of doom, as all the sawdust breaks apart, causing a huge amount of surface area - AKA "fuel for the fire" to be exposed.
Also, they don't burn overly clean. You'll need to have your chimney cleaned if you burn them regularly.
I've yet to try a "cleaning" log, but If i do, i'll be taking before and after photos! Expect a new post on this in the new year.
Our three hour log lasted 4 hours. It was a late night for a work night. Since you can't just break it up for fear of the fireball of doom, you're forced to just wait it out.
One Nice thing about the 3 Hour log is that it doesn't crackle much - No sparks flying, We put the chain mesh screen in front anyway, but we didn't need to. it also burns down to pretty much nothing, reducing the number of times you have to clean the ash out of your fireplace.
Conclusion:
All said and done... I love the fireplace, but for the work/hassle, I think I'd Prefer gas next time and sacrifice some of the "traditional" feel you get from a wood burning fireplace. I wonder if they make "open" gas fireplaces not surrounded by Glass. That would be a good compromise.
There are a few pros, and a few cons to this:
Pros:
Its a nice looking, Painted Brick Fireplace and it adds to the rooms cosyness.
In A Power Outage, we have a way to keep our house and our pipes from freezing
Chestnuts roasting on an open fire. (need I say more?)
My odds of surviving a zombie apocolypse are slightly better.
Cons:
Insurance isn't a fan of these and you'll pay a dollar or two more a month as a result
Some minor heat loss/drafts when not in use
Storing wood is a pain. Bringing wood into your house can also bring pests/bugs
So, I Megan and I actually committed to staying up and watching TV until 11, so we decided to burn one of our 3 hour logs I bought before a big storm coming our way (they warned of blackouts... I figured that was as good as excuse as any to spend money)
My Father in law told me that I should burn some news paper to warm up the chimney.
I assumed - hey, the 3 Hour log is covered in paper - Should be good enough! *shrugs*
So I proceed to Open the Flu (a lever that opens up a flap to connect your chimney to the house) Light the paper, and almost immediately panic.
It was like... a Wall of smoke, billowing into my house. Panic, Running around, "do we have a bucket?!?" ensued, then an eternity later (about 10-15 seconds) I decided my best course of action would be to close the glass doors and the vent at the bottom.
Once the flame got going, things settled down. Half a can of febreeze in the basement and the smoke smell was sufficiently masked.
Should have listened to the Father in Law. (wow, did I just say that?)
Lesson number 1: Hot air rises.
It was a cold, windy day... and Cold air sinks. That cold air came rushing into my basement via the chimney blowing the flame/smoke into our
Thankfully, My knee jerk reaction of closing the glass doors helped a little bit. It reduced the amount of wind rushing down through the fireplace into my house enough that the flame was able to heat the air enough to get some hot air rising - Convection. Once this occurs, Smoke goes out the chimney, rather than billowing into my basement.
"3 Hour Logs"
A warning about "three hour logs" and such - They're basically sawdust held together with wax. They don't make a huge flame - But if you poke them while they're burning, they'll desintigrate into a fireball of doom, as all the sawdust breaks apart, causing a huge amount of surface area - AKA "fuel for the fire" to be exposed.
Also, they don't burn overly clean. You'll need to have your chimney cleaned if you burn them regularly.
I've yet to try a "cleaning" log, but If i do, i'll be taking before and after photos! Expect a new post on this in the new year.
Our three hour log lasted 4 hours. It was a late night for a work night. Since you can't just break it up for fear of the fireball of doom, you're forced to just wait it out.
One Nice thing about the 3 Hour log is that it doesn't crackle much - No sparks flying, We put the chain mesh screen in front anyway, but we didn't need to. it also burns down to pretty much nothing, reducing the number of times you have to clean the ash out of your fireplace.
Conclusion:
All said and done... I love the fireplace, but for the work/hassle, I think I'd Prefer gas next time and sacrifice some of the "traditional" feel you get from a wood burning fireplace. I wonder if they make "open" gas fireplaces not surrounded by Glass. That would be a good compromise.
Monday, November 26, 2012
Misfiring Furnace
So, The colder weather is upon us.
My House is an Old(ish) one, and I'm fairly sure the furnace only has a few years left on it.
I noticed, that sometimes, it fires up, turns off immedately, and then fires up again, and stays on, heating my house.
There is a little sensor inside your furnace, that makes sure that there is a fire inside. If this sensor doesn't detect fire, it shuts off the gas immedately.
Why?
if it kept spewing gas into the furnace, with no fire, you could potentially have an explosive situation on your hands. And considering you're still getting comfortable in your new house... having your basement blow up on you isn't the most ideal situation.
So I cranked up the heat and ran down stairs. Sure enough, on the first attempt - there WAS fire. But it shut off anyway.
After much googling (5 minutes is an eternity to someone as impatient as me) I figured out the issue.
That little sensor, had collected up a lot of Carbon/soot and dirt on it. Insulating it from the heat a bit. As a result it was telling the furnace that the party hadn't started yet, and to shut the gas off.
It was easy to fix. I stupidly didn't document it, but I followed this youtube video to a T, and it was perfect in helping me.
Basically, taking this sensor and sanding it clean fixed my issue. Yay for saving myself a few hundred dollars!
Thursday, November 15, 2012
The Key to DIY - The Garage/Workbench
So, I've got a house!
A house... that also has a Garage.
Its a single car garage, 10X22 If I can remember.
So... A single Car Garage, basically means No cars go in the garage. Sadly, the garage will most likely become the repository of all things dirty, ugly, and unused. Bicycles, Lawn Mowers, Shovels, Garbage, Recycling, Tires, Car stuff, Sports stuff, scraps of wood/materials from other projects/renos, Paint cans, Decorations for Halloween Christmas, and whatever else you dress up your house for. Fitting your car in there with all that stuff is unlikely, unless your lucky enough to get a two car garage. (Which I propose renaming to single car garage)
So, Give up, your car isn't going in there.
Make part of it your Work space.
A Garage well stocked with tools and work space can save you a bundle of time and money. You can build, repair appliances, soldier, paint, fix cars, bicycles, toys (both kids, and your own) etc.
Its a very practical space, and its important (to me, at least)
There are 5 key points to a decent garage.
1. Work space
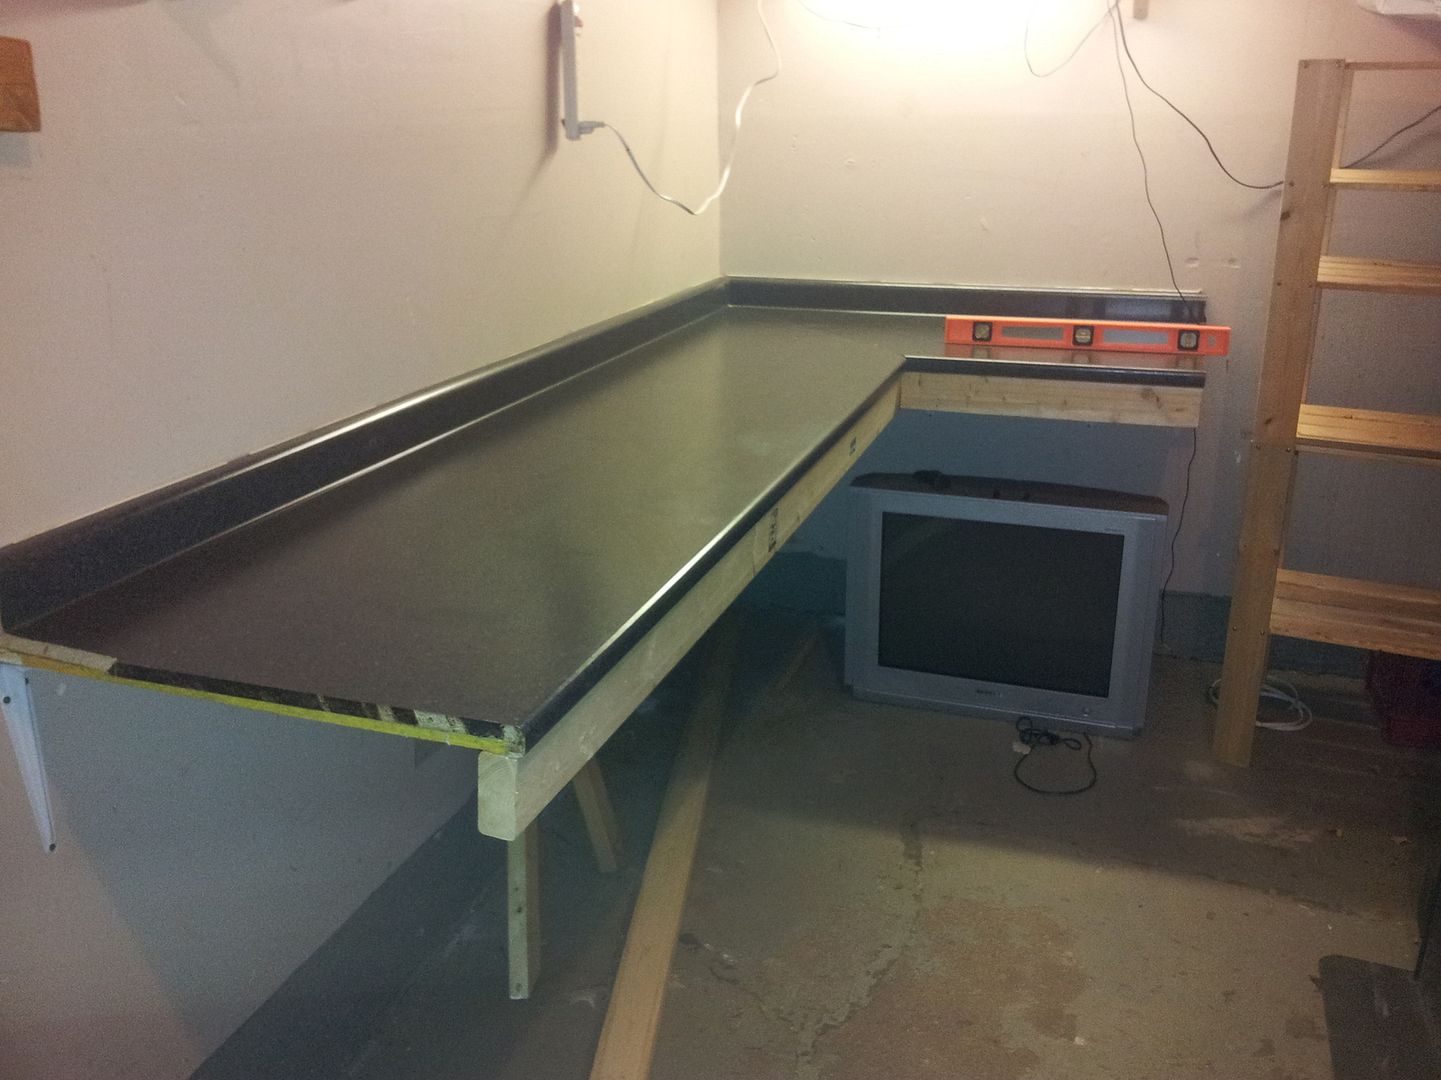
You need a place to work. A higher than normal (36 inches, instead of 32) Counter top I found one for 40 bucks on kijiji, and its doing the job perfectly. Mounting it is the tricky part. First, get some No more nails, and some plywood. You'll want to glue the plywood to the bottom of the counter top to give it more strength You will be hammering, prying, smashing, pounding... (etc etc) on this counter top so it will need to be better supported than your average kitchen counter top.
You can use 2 dollar shelf brackets to attach it to the wall, provided you hit studs on every one. (Get a stud finder, or knock until it doesn't feel solid. If your screw goes in to the wall too easy after an inch, you missed the stud. try again, but don't make swiss cheese out of your drywall... ...get a stud finder)
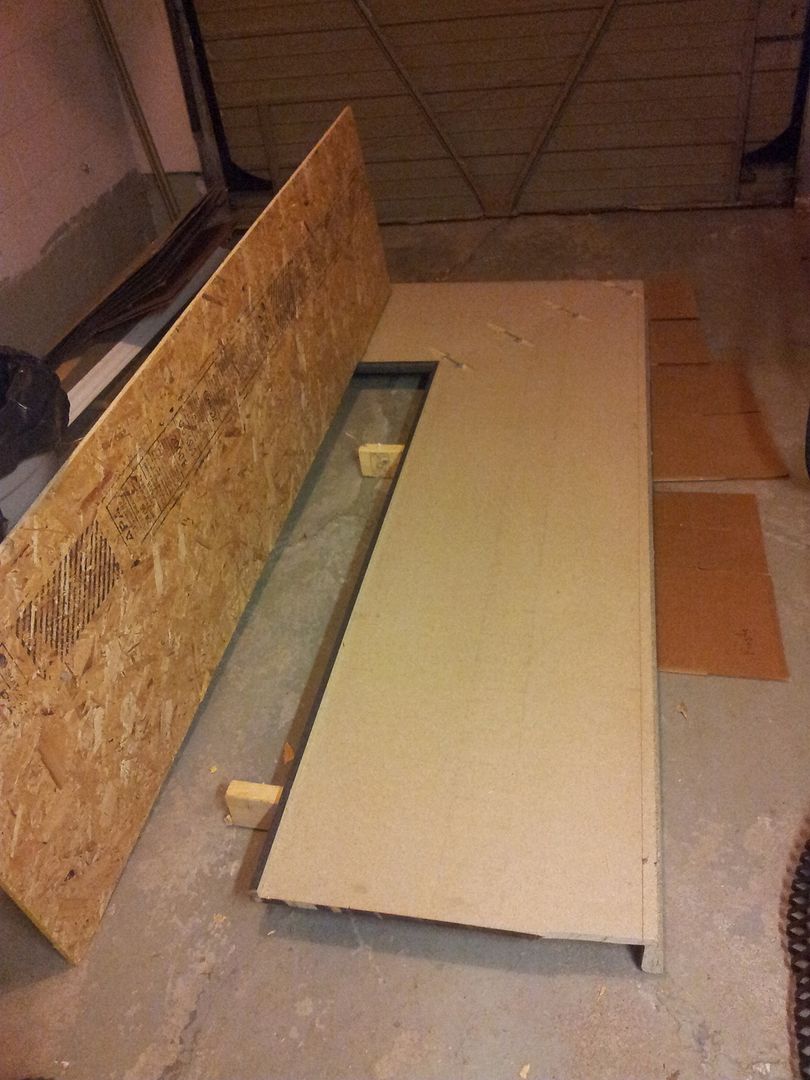
You'll then want to build Legs and a support along the front, so you can basically sit on the counter top without it moving an inch. here's a picture of mine, before I put the legs in for support. You can see, however that I've started the "beam" along the front in which my legs will attach to.
Putting the legs on was the tough part. I used 2 2X4's and some Deck Mounting brackets to hold it all in place. The HARD part... was that my floor slopes. A Lot. In the photo above, the corner close to us is 38 inches off the ground. By the old TV (waiting for a garage sale) is 33&1/4 inches off the ground. Nearly 5 inches over 8 feet. Horrible.
Anyway, the legs are in, and pair of elephants could do the nasty on there, and it would hold steady.
2. Lighting
The single light bulb on your garage door opener or ceiling is not going to cut it.
If your handy, get one of those light socket replacements that has a plug in it as well. Then go to home depot, get a 17 dollar T8 Shop Light (4 feet long, florescent lights) and 2 bulbs (10 bucks) Mount it on the ceiling above your workbench. Wala! Light! The long florescent lights are preferred as they cast less shadows and allow you to see your work with ease. They're also a nice "clean" light. Avoid the "warm" colored lights in the garage. Clean and white is what you need.
3. Storage Space
So, on top of all the stupid decorations and gardening tools that will no doubt find their homes in your garage, you'll also need to store your stuff. Car Parts, Tools, Sports equipment, Paint cans, solvents, nuts and bolts...
I've got Rubbermaid totes stacked under my workbench with commonly used parts, but hand tools were starting to clutter up my brand new(used) re-purposed kitchen counter.
Easiest way to start doing this without an expensive tool box is to grab a spare piece of plywood, screw it onto the wall and drive a few screws/nails half way into it. commence hanging of the tools. Its awesome, its right in plain view and easy reach, and because its right in front of your face, you're more likely to put the tool back after using it, preventing a lengthy head scratching session trying to remember where you just put a tool down 3 minutes ago.
A double whammy is Shelving. You'll need a ton of it. its relatively cheap. under 20 bucks for an 8 foot shelf. a 8X12X1 white board is 10 bucks at Home Depot, then 5-6 shelf brackets are $1.75 This shelf should hold 100 pounds if you have it mounted on studs.
 4. "MOAR POWER!!!"
My garage is horrible for this. I have one outlet. It currently looks like the grizzwald christmas light socket. (which is wrong. VERY very wrong)
It is on the same circuit as the front foyer in the house. It also powers my 7 amp pool pump.
So when I fire up my 12 amp skill saw (or the chop saw I keep stealing from my future brother in law...) Pop goes the breaker.
I will be running another circuit up to the garage, but will probably (PROBABLY) save up for an electrician to do this. We'll see. Bottom line... an outlet every 4 feet is awesome. No more need for extension cords. Try and do "splits" so the top plug is a difference circuit from the bottom one. that way you can put to heavy usage items on the same outlets without popping breakers.
Again, You probably don't need this right away... but if you're going to be spending a lot of time in the garage, and have a lot of high draw toys (Saws, Impact Guns, Electric heaters, Shop Vacs, Drills, Lights...) You'll probably eventually need more than the average home provides.
5. Tunes.
Yeah... its important. Music makes any job so much better. Get that old crappy stereo your parents got you when you were an angsty teenager. You know, the one you used to make mix tapes with? The one that is stuck in "demo" mode forever cycling cheap LCD graphics of Rock, Pop, Classical, and Bass Boost propaganda all over its screen? Yeah, That one. :-) Put speakers on either side of the garage. (Yay Shelves)
See if it has an AUX in or TV in. Buy a 8 dollar RCA - 3.5 Headphone cable. Plug it in, turn it to AUX, and play the tunes from your phone. (or just listen to the radio like old people do)
That's it!
Mostly.
If you don't have any tools, and you don't know how to change a light bulb .. Sorry for wasting your time.
If you'd like to try fixing your own stuff and some projects, I strongly recommend getting a tool kit if you don't already have a decent selection of tools. You can get them for about 100 bucks, and they contain almost everything you need, and are much cheaper than buying the items individually.
Something like this is a great start,
Or this, as a more expensive (but complete example)
So, I've got most of this set up in my garage already, and I've already used it to work on both our cars, repair discovered Christmas decorations, Build Steps for the back deck, clean up a pool pump, Build a Bench, Vegetable Garden, Help a friend rip out his malfunctioning car alarm, Soldering electronics, and various woodwork projects. This is all in the last month! Pretty useful "storage" space if you ask me!
While the car doesn't fit all the way in now (it might if I REALLY wanted it to) I can get 2/3rds of it in the dry of the garage to work on. A small area heater would prevent me from freezing my gonads off come winter, but I'm too cheap to buy one, and I'd probably pop a breaker anyway, until I get that other circuit added.
Now that I've got my garage "running" I'll be posting more and more DIY projects as I tackle them. Any requests?
Leave comments! I can see people are reading, but I don't know if you're liking it! (FYI, Just celebrated my 1000th visitor Yesterday! (Nov 14th, 2012))
A house... that also has a Garage.
Its a single car garage, 10X22 If I can remember.
So... A single Car Garage, basically means No cars go in the garage. Sadly, the garage will most likely become the repository of all things dirty, ugly, and unused. Bicycles, Lawn Mowers, Shovels, Garbage, Recycling, Tires, Car stuff, Sports stuff, scraps of wood/materials from other projects/renos, Paint cans, Decorations for Halloween Christmas, and whatever else you dress up your house for. Fitting your car in there with all that stuff is unlikely, unless your lucky enough to get a two car garage. (Which I propose renaming to single car garage)
So, Give up, your car isn't going in there.
Make part of it your Work space.
A Garage well stocked with tools and work space can save you a bundle of time and money. You can build, repair appliances, soldier, paint, fix cars, bicycles, toys (both kids, and your own) etc.
Its a very practical space, and its important (to me, at least)
There are 5 key points to a decent garage.
1. Work space
You need a place to work. A higher than normal (36 inches, instead of 32) Counter top I found one for 40 bucks on kijiji, and its doing the job perfectly. Mounting it is the tricky part. First, get some No more nails, and some plywood. You'll want to glue the plywood to the bottom of the counter top to give it more strength You will be hammering, prying, smashing, pounding... (etc etc) on this counter top so it will need to be better supported than your average kitchen counter top.
You can use 2 dollar shelf brackets to attach it to the wall, provided you hit studs on every one. (Get a stud finder, or knock until it doesn't feel solid. If your screw goes in to the wall too easy after an inch, you missed the stud. try again, but don't make swiss cheese out of your drywall... ...get a stud finder)
You'll then want to build Legs and a support along the front, so you can basically sit on the counter top without it moving an inch. here's a picture of mine, before I put the legs in for support. You can see, however that I've started the "beam" along the front in which my legs will attach to.
Putting the legs on was the tough part. I used 2 2X4's and some Deck Mounting brackets to hold it all in place. The HARD part... was that my floor slopes. A Lot. In the photo above, the corner close to us is 38 inches off the ground. By the old TV (waiting for a garage sale) is 33&1/4 inches off the ground. Nearly 5 inches over 8 feet. Horrible.
Anyway, the legs are in, and pair of elephants could do the nasty on there, and it would hold steady.
2. Lighting
The single light bulb on your garage door opener or ceiling is not going to cut it.
If your handy, get one of those light socket replacements that has a plug in it as well. Then go to home depot, get a 17 dollar T8 Shop Light (4 feet long, florescent lights) and 2 bulbs (10 bucks) Mount it on the ceiling above your workbench. Wala! Light! The long florescent lights are preferred as they cast less shadows and allow you to see your work with ease. They're also a nice "clean" light. Avoid the "warm" colored lights in the garage. Clean and white is what you need.
3. Storage Space
So, on top of all the stupid decorations and gardening tools that will no doubt find their homes in your garage, you'll also need to store your stuff. Car Parts, Tools, Sports equipment, Paint cans, solvents, nuts and bolts...
 |
| This is a little anal for my liking, but you get th idea. Drive some nails/screws into the wall, Hang tools. |
I've got Rubbermaid totes stacked under my workbench with commonly used parts, but hand tools were starting to clutter up my brand new(used) re-purposed kitchen counter.
Easiest way to start doing this without an expensive tool box is to grab a spare piece of plywood, screw it onto the wall and drive a few screws/nails half way into it. commence hanging of the tools. Its awesome, its right in plain view and easy reach, and because its right in front of your face, you're more likely to put the tool back after using it, preventing a lengthy head scratching session trying to remember where you just put a tool down 3 minutes ago.
A double whammy is Shelving. You'll need a ton of it. its relatively cheap. under 20 bucks for an 8 foot shelf. a 8X12X1 white board is 10 bucks at Home Depot, then 5-6 shelf brackets are $1.75 This shelf should hold 100 pounds if you have it mounted on studs.
 4. "MOAR POWER!!!"
My garage is horrible for this. I have one outlet. It currently looks like the grizzwald christmas light socket. (which is wrong. VERY very wrong)
It is on the same circuit as the front foyer in the house. It also powers my 7 amp pool pump.
So when I fire up my 12 amp skill saw (or the chop saw I keep stealing from my future brother in law...) Pop goes the breaker.
I will be running another circuit up to the garage, but will probably (PROBABLY) save up for an electrician to do this. We'll see. Bottom line... an outlet every 4 feet is awesome. No more need for extension cords. Try and do "splits" so the top plug is a difference circuit from the bottom one. that way you can put to heavy usage items on the same outlets without popping breakers.
Again, You probably don't need this right away... but if you're going to be spending a lot of time in the garage, and have a lot of high draw toys (Saws, Impact Guns, Electric heaters, Shop Vacs, Drills, Lights...) You'll probably eventually need more than the average home provides.
5. Tunes.
Yeah... its important. Music makes any job so much better. Get that old crappy stereo your parents got you when you were an angsty teenager. You know, the one you used to make mix tapes with? The one that is stuck in "demo" mode forever cycling cheap LCD graphics of Rock, Pop, Classical, and Bass Boost propaganda all over its screen? Yeah, That one. :-) Put speakers on either side of the garage. (Yay Shelves)
See if it has an AUX in or TV in. Buy a 8 dollar RCA - 3.5 Headphone cable. Plug it in, turn it to AUX, and play the tunes from your phone. (or just listen to the radio like old people do)
That's it!
Mostly.
If you don't have any tools, and you don't know how to change a light bulb .. Sorry for wasting your time.
If you'd like to try fixing your own stuff and some projects, I strongly recommend getting a tool kit if you don't already have a decent selection of tools. You can get them for about 100 bucks, and they contain almost everything you need, and are much cheaper than buying the items individually.
Something like this is a great start,
Or this, as a more expensive (but complete example)
So, I've got most of this set up in my garage already, and I've already used it to work on both our cars, repair discovered Christmas decorations, Build Steps for the back deck, clean up a pool pump, Build a Bench, Vegetable Garden, Help a friend rip out his malfunctioning car alarm, Soldering electronics, and various woodwork projects. This is all in the last month! Pretty useful "storage" space if you ask me!
While the car doesn't fit all the way in now (it might if I REALLY wanted it to) I can get 2/3rds of it in the dry of the garage to work on. A small area heater would prevent me from freezing my gonads off come winter, but I'm too cheap to buy one, and I'd probably pop a breaker anyway, until I get that other circuit added.
Now that I've got my garage "running" I'll be posting more and more DIY projects as I tackle them. Any requests?
Leave comments! I can see people are reading, but I don't know if you're liking it! (FYI, Just celebrated my 1000th visitor Yesterday! (Nov 14th, 2012))
Tuesday, November 13, 2012
Utility Bills
So, this is going to be a work in progress, I'll update this post as time goes on.
One of the hardest things for me to budget for when buying a house, was Utilities. My folks had a bigger house than me, with a pool. My other friends are in Condos. Nobody has a house, my size, with my utilities.
So, I left enough of a buffer to cover what I THOUGHT would be the costs. Thankfully, I was largely spot on with my estimates, although I made those estimates with room to spare (so I thought)
So, here are my current regular costs on utilities, after 3 full months.
But First, I should warn you... the thing that annoys me the most is the frequency.
As it stands, I have to worry about 5 pay schedules
I'll order them into best to Worst in terms of convenience. (because bills just suck)
Monthly:
Source Cable - 1st of every month - 58 bucks
RRSP repayment - 2nd of every Month - 150 bucks (from downpayment via First Time Home Buyer Plan)
House Insurance - 2nd of every month - 78 bucks
Every Other Month:
Horizion Power, water - 130-150 bucks, 18th of every OTHER month
Whenever they feel like it: (apparently every 2 months, but sometimes 3...?)
Reliance Hot water tank rental. This bill is all over the place, and they seem to have a multitude of reasons why. Supposed to be 18 bucks a month. I'll be buying my own hot water tank ASAP as currently its having issues with water pressure that they refuse to fix.
TAXES:
A special note about Taxes:
If your mortgage stipulates that they will pay the taxes for you, and they withdraw a monthly amount from your bank (aka your mortgage payment is higher) Make sure they start paying your taxes RIGHT AWAY.
My Mortgage Company (First National) Burned me. I am SO unhappy with them its not even funny.
I got a notice from Hamilton saying that I was overdue on my taxes. i told them this was impossible, as my Mortgage company has been collecting taxes from me for the past few months.
I call First National, and they start bullshitting around the entire thing.
Bottom line, They won't pay taxes until they've collected enough money from you to pay the taxes. Even though on my contract with them, it says: "Taxes Paid by Lender"
So, I got shafted with an 800 dollar tax bill for the last quarter of 2012.
I've since got it, in WRITING, that they will pay my next tax payment in February, for Q1 Taxes of 2013.
So, if you know me, and are expecting a Christmas present this year... Blame it on First National. Not only am I paying them 230 bucks a month to them for my taxes, but I had to come up with 800 dollars on the spot to pay taxes... which they told me verbally that they were paying when I took out the mortgage.
On page 23 of some stupid agreement, it says that it is up to their discretion as to if they pay taxes on a partial years taxes. But when the mortgage broker, Lawyer and Realtor explained it to me, they said that they WOULD pay the taxes, because the mortgage company sleeps easy knowing that the taxes are paid and there isn't a lien against "their" house.
Bottom line, is First National (as well as most people who "sell" money) is a bunch of effing bullshitters, but there's really nothing I can do about it, except Learn from it and spread the word.
So, When you're looking at your mortgage terms... Just Budget your own taxes and tell the mortgage company that you'll do it yourself. Or, Tack a $500-1000 bucks onto your closing costs - Just in case they pull some bullshit with you too.
Oh... and when I called First National on it, they told me that they could pay it for me, but would charge me a large (Can't remember, was enraged... around 150? dollars) fee to do so, and then would increase my monthly payments accordingly. I gave the phone the finger, Weighed my options and decided to bite the bullet.
I'll be asking First National for the interest on the tax money they're currently holding.
Huge Rant/Warning aside,
Taxes are done a few different ways, Call your City before you buy/budget to find out. Some do monthly, Quarterly, or do an up front payment, then an adjustment based on new rates, then a final payment. its confusing. But, you can budget a monthly rate for yourself and set it aside, (or have the bloodsucking mortgage company do it for you.
(I think its obvious where I stand on this front now)
Other than that, A quick breakdown on my monthly budget for utilities:
$18 Water Tank
$40 Water+ Sewage
$70 Gas
$70 Electricity
$80 House Insurance
$230 Taxes
Just over 500 bucks a month, for utilities.
There is a variance in all of these. In the summer, I used 20-30 bucks in Natural Gas. In the winter, I expect to use 100-120 bucks in gas. So I signed up for Equal Payment Plan, where I pay 68 bucks a month every month, regardless of usage. if it looks like I'm going to blow past that, I'll up the monthly payment to compensate. If I stay well under that average, I'll get a credit toward my next year.
That basically covers utilities!
I'll try and write soon! Any Requests? leave a comment!
Wednesday, November 7, 2012
Moving that effing fishtank...
So, I had a big long post written, but decided to scrap it.
It had all the moves I've done poorly in the past. Rather than bore you with the topic of dead fish, I decided just outline the "Sudz" way of moving a fish tank properly.
First, I'll just say this: If you can't lift up your fish tank by yourself, then its too big to move on moving day. so, if you have 20 gallons or bigger, DEDICATE AN ENTIRE AFTERNOON/EVENING to it. Doing so will avoid in expensive errors and floating fishies.
Some important information about your filter:

OK, start paying attention again.
So, when you unplug your filter when you are starting your move, you have 2 hours before your filter dies. Start a timer.
Your mission, should you choose to accept, is to transport your filter and set it up within 2 hours.
Important information about your Tank:
Onto the process:
My BEST Move:
About the Existing equipment: (with links)
Moving Equipment:
How I Move a fish tank:
Part 1: Prepping it

Some notes and pointers:
It had all the moves I've done poorly in the past. Rather than bore you with the topic of dead fish, I decided just outline the "Sudz" way of moving a fish tank properly.
First, I'll just say this: If you can't lift up your fish tank by yourself, then its too big to move on moving day. so, if you have 20 gallons or bigger, DEDICATE AN ENTIRE AFTERNOON/EVENING to it. Doing so will avoid in expensive errors and floating fishies.
 |
| Canister filters are easy to transport! |
Some important information about your filter:
- Your Filter is ALIVE.
- If it dries out, it dies.
- Circulating water through it is like "breathing"
- If water isn't circulated for 2 hours, the Filter suffocates and starts to die. (even when wet!)
- If your filter dies, it becomes toxic to your tank when you turn it on again
- Your filter harbors good bacteria to process waste.
- When your filter dies, the dead "good bacteria" contributes to that waste, and can no longer process it.
- Dead Filter = Dead fish with out huge interventions
- Your filter bacteria can be "weakened" by a move
More advanced stuff about your filter:
(you can ignore this if you're falling asleep right now)
- Friendly bacteria consists of 3 different "conversions"
- Fish poop turns into Ammonia. (NH3)
- Ammonia is highly toxic to fish.
- Bacteria starts to thrive...
- This Bacteria converts the Ammonia to Nitrite
- Nitrite is highly toxic to fish (jebus, does it ever end?)
- DIFFERENT bacteria starts to thrive
- It converts Nitrite into Nitrate (NO2- to NO3-)
- Nitrate is... safe in small amounts.
- Nitrate is basically a fertilizer. Plants and water changes handle this to keep it manageable (under 20ppm is ideal)
- While bacteria thrives and grows very quickly, it takes weeks or months to start a filter from "scratch".
- This is why keeping your filter alive is necessary - Because you've got a full tank of fish, and can't be starting a filter from scratch without a serious amount of work, and stress on your fish.
OK, start paying attention again.
So, when you unplug your filter when you are starting your move, you have 2 hours before your filter dies. Start a timer.
Your mission, should you choose to accept, is to transport your filter and set it up within 2 hours.
Important information about your Tank:
- Fishtanks are very strong, but brittle. Shock/points will shatter them, but the danger is bending
- Bending/warping of the fishtank will crack the seals around the edges, and cause slow, or sudden, disastorous leaks a day after you fill it up again.
- 90% of the tank strength is actually from the silicone that holds it together. (this has always scared the shit outta me)
- It's important to lift from the bottom, as opposed to the "bear hug" from the side.
- You cannot move a medium/large sized tank with water or gravel in it. (2 inches gravel + 5 gallons water = ~140 pounds.
- Don't even try to move a partially full larger tank (40 gallons or larger), no matter how many people you have. The sloshing of water will put too much stress on the tank.
- And even then, with the custom stand, Good luck transporting it that way without it sliding off.
Onto the process:
My BEST Move:
About the Existing equipment: (with links)
- 75 Gallon tank
- Planted Heavily
- Discus fish (Beautiful, fragile, EXPENSIVE fish)
- Fluval 304 Canister Filter
- Random Power-head
- T5HO and LED lights
- Rusty Steel tube stand at apartment
- Nice new wooden stand at new house
- 300 watt Heater
- APC VA550 UPS
- Light Timer
- Water Testers (Nitrate, PH, Nitrite, Ammonia,)

Moving Equipment:
- Involved 2 vehicles: a Mazda5, and a Honda Fit
- 5x 4 gallon buckets from home depot ($25)
- Old towels to clean slopped water
- Gravel Vac/Python no SPill clean and fill
- 32 Gallon Rubbermaid Industrial garbage can (rinsed, purchased new, with lid) ($40)
- 100 Watt "backup" heater
- Air Pump
- Cardboard. Lots of cardboard.
- Fiancee, and 2 good friends!
How I Move a fish tank:
Part 1: Prepping it
 |
| My Big Bucket-o-Fish |
- Unplug Lights, heater, Power Head (leave the filter!)
- Drain Nice, Clean tank water (before you stir it up) into big 30ish gallon bucket. This should be about 15-20 gallons worth of water, your filter should still be able to run with your tank this low.
- Plug in 100 Watt heater, Air bubbler into big bucket of water.
- Unplug filter and plug back in when moved into big bucket.
- You now have a big bucket with 20 Gallons of water, and fish, running with your heater, bubbler and filter.
- Continue to drain "clean" water into a few buckets. (Leave enough buckets for the substrate/pebbles)
- Remove Plants and decorations. Be sure to rub them down and remove as much dirt/algae as possible. Put some plants in with the Fish in the large bucket. Put some in your water buckets.
Part 2: Tear Down
- Drain the rest of the tank down to 2 inches, using a gravel vac. Try and vac the gravel as best you can.
- Stir up the gravel a lot when you have two inches of water left. Then start scooping it out and stirring it, putting the gravel into your remaining few empty buckets.
- Once you have 90% of the gravel out, Drain the rest of the tank.
- Scoop out the remaining gravel, and start cleaning/scrubbing your tank before it dries.
- You might have to put some fresh water into your tank to get it nice and clean. Avoid Soaps. Some solvents are OK if properly rinsed afterwards, but I didn't use any. When in doubt, Just use elbow grease and an algae scraper pad from your local pet store.
- Lay down some cardboard (no staples!) inside the vehcile. This is to prevent a pebble/point (seat latch, etc) in your dirty van from scratching or impacting on the glass. it also provides more uniform support for the bottom of the tank (important to prevent bending)
- Move the tank, stand, and lighting equipment into a vehicle.
- Now, if you don't have a UPS, Start the timer of doom. You have 2 Hours from this point.
Part 3: Moving it

- Unplug your equipment currently running in the big bucket. Plug it back into the UPS, which will now be beeping, warning of a power outage.
- Move the whole kit and caboodle into your car. Try and be gentle with the fish tank.
- The UPS (if you have one) gives you an extra 30 minutes to play with.
- Drive slowly (smoothly) to your new house.
- Move Stand into new location, preferably across multiple floor joists (more on this)
- Put cardboard or even better, styrofoam, unter the tank, on the stand. it will alleviate any pressure points.
- Move rest of stuff inside
Part 4: Setup
- Plug in UPS/powerbar so the filter/heater/bubbler runs again
- Level Stand (Important: Not level = unbelievable stresses on fish tank, warping... doom)
- Put small piece of cardboard in bottom of tank
- Slowly pour/scoop gravel into tank
- Slide out cardboard piece (was to prevent rocks from hitting glass directly)
- Continue putting gravel in tank.
- Fill tank a few inches with 80 degree, dechlorinated tap water.
- Re-plant Plants, place decorations
- Put in cardboard/plate something to pour water on so it doesn't mess up your "aquascaping"
- Pour whatever tank water you saved in your smaller buckets into tanks,
- Fill tank half way
- Transplant heater, filter, to new tank and plug in, ensuring the heater is BELOW the water line.
- Use warm/cold tap water to Equalize temperature between large bucket and tank
- At this point, your fish tank should be half full of tap water, and half full of your Old fish tank water.
- Continue to fill your fish tank Your Big bucket should be about 1/4 full, your fish will be OK in there for about 30 minutes. You can add warm tap dechlorinated water occasionally if its cold in your house, to keep them warm. it also slowly acclimates them to the water they're about to be dumped in.
- The Fish tank should be about 75% full
- The filter running should have cleared the water a fair bit. It won't be crystal clear for about a day.
- Do a Nitrate Test. If its in an acceptable range, (for hardy fish, 80-100ppm, for delicate fish, 20-40 ppm) Proceed to next step
- Do a PH Test on both your big bucket, and the new aquarium If its off by more than .4 (in my opinion) you should drip tank water into your big bucket via air hose to make it easier on your fish. when the PH is close, proceed to next step.
- Transport your fish over by hand/net, or by slowly dumping the bucket. I like the hand method better, particularly with larger fish, because if you dump them all in at the same time, they're likely to dart around, freak eachother out, hit a glass wall and knock themselves out cold. One by one over 15 minutes is Slightly less intense for them.
- You can take a breather now. (Your filter trickling into the water has probably made you have to pee.)
- Keep an eye on the fish, and the temperature. The heater being bumped around might have changed its settings.
- Assemble your lights and put them into place, but DO NOT TURN THEM ON for at least 24 hours.
- Tidy up the wires, lines, filters, etc.
- Do Ammonia, and Nitrite tests every day at MINIMUM. if you ever read any of either of these, start doing 40-50% water changes daily. Your tank is going through a mini "cycle" as too much friendly bacteria has died. It'll take a while to build them up again. Do these tests daily for the first week, then you can ease them off.
- Top up the tank. (If you did a bad job at leveling the tank... you'll notice it now!)
- if you have a magnetic algae scraper, you might want to remove the bubbles clinging to the glass. Its just aesthetics. No Negative impact.
- Sit back and enjoy your tank - That was a lot of work!!!

Some notes and pointers:
- If you have a Long move, you can cycle the UPS on and off. Running your filter for 5-10 minutes helps it breathe, almost resetting the 2 hour timer of doom. A cheapish 110volt car inverter would also do here, for longer moves. (note, if you have a good sized heater, you'll need a beefy inverter)
- Bring Extra towels. you'll slop. Trust me.
- When your fish are still in the tank, don't stir up the crap. It'll kill the fish. Nitrates are OK, but they're super concentrated int he gravel. if you HAVE to remove your driftwood/deocrations to catch your fish, do so VERY SLOWLY as to not stir up to much crud.
- Planted tanks are harder to clean. the poop turns into dirt, and if you gravel vac a planted tank regularly, your plants don't do as well. So my tank was filthy.
- Your Gravel also has a lot of "good" bacteria. Don't rinse it in tap water, the chlorine in tap water will kill the good stuff.
- Its significantly easier to move a cansiter filter. a HOB (hang on back) filter like an aquaclear (which I love, fyi) Are harder, because you can't keep them running. if you have a hang on back filter, your best best is to rise the media in some tank water, Get rid of that dirty water, and then put all that relatively clean media into one of your water buckets.
- If your fishtank is less than 55 gallons, put it anywhere against a load bearing wall, and you'll be fine.
- If your fishtank is larger than 55 gallons, you need to carefully consider where you are putting it. I'd say a 125 gallon tank is the maximum you should have in a wooden house, unless you beef up the floor/frame around it.
- Earlier I said to try and put your tank in a way that it will be supported by more than one floor joist. This is hard to explain. Your floor joists either run along the X or Y axis of the room. if you have a 4 foot fishtank, ideally, you could have your tank be supported by 3 or 4 joists. (plywood in the floor spreads out the load) If you run it in paralell with your floor joists, the majority of the weight will be carried by 1 or 2 joists. If that doesn't make sense, leave a comment with your questions!
Massively boring post. Next post isn't written yet, but I think it might be about installing a workbench in my garage!
It takes me a ton of time to write these posts! Please leave comments or spread this blog around if you are enjoying what you read!
I'll try to keep up with my new posts, every Monday, Wednesday, and Friday!
See you Friday!
Monday, November 5, 2012
The honeymoon is over... The rose colored glasses are off!
So, you've moved in.
Why did I use 70 dollars of electricity in the first week of owning my house?!?
I started looking around at culprits.
Having the A/C on 90% of the time because a clogged filter was a good start...
I started looking at the light fixtures. Many of them had 3, 100 watt Old-school incandescent bulbs!
Some of these light fixtures had 3 or 5 50 watt halogen bulbs. These suckers put out so much heat, the A/C was fighting them to cool the room!
WHY did they need to have 500 watts of lighting for a foyer?
I replaced the light with a fixture that has 2, 14 watt bulbs in it. Yay for a 472 watts savings!
Moral of these stories:
These moments usually result in an evenings work to fix. They're usually not urgent... They're just things that will bug you, every time you see them.
I've had at least a dozen of these moments. Probably more. As I encounter more I'll be chronicling it on here, with photo's, Both on discovery and how I fixed it.
I've had:
I honestly didn't know how many things had gone wrong in 3 months until I counted all this. Its kind of fun (for me) to work on our house. Its something to do that is constructive, rather than wasting away in front of a computer/PS3 like I'd do with apartment living.
So, if your house isn't new, and someone else has meddled with it in the past, you will most likely have a few of these "What the hell?!...." moments where you're scratching your head in confusion and frustration.
Keep in mind, My house was built in 1978. If you thinking of buying a century home and either:
Don't do it!. Stick with a newer home.
The GOOD news is, Most of these things can be figured out and fixed in an evening, with relatively inexpensive trips to Home Depot. They're challenges, But we'll get through them.
So all this being said... time for another disclaimer.
I am not an Electrician, a Plumber, a Contractor, or certified in any way.
If you take any advice I have on this blog, You are 100% responsible for the outcome. Do your research before tackling any project. I'm just here to say, "It has been done, and here's how I did it." Moral support, I suppose.
Before I tackle a project, I:
There'll be a week which I called the "honeymoon" period in which everything is amazing.
Then, you'll notice a few things... blemishes in walls, Shelves mounted in drywall instead of studs (that happened to hold pool chemicals right over my head when I work in the garage.)
Eventually, these will build up, and you'll find a spree of these at once, because you've noticed one, and now you're looking for them. (Kind of like when you buy a mazda3 or civic... All of a sudden, every other car on the road is one)
There will come a time, when you are walking somewhere, and you'll notice one of these things, and just shake your head, thinking "Double-you-tee-eff..."
as in: WTF were they thinking?!?!
We had SEVERAL "WTF" moments...
Why doesn't the fridge water/icemaker work?
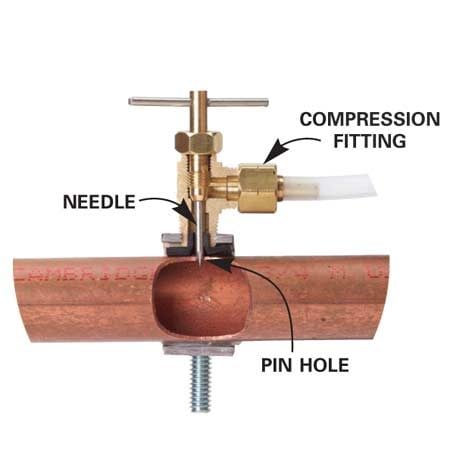
The water must be shut off to it. Typically water to a fridge is done via thin white/clearish plastic tubing, which is attached to a special valve that clamps and pierces a normal copper line (like this one --->)
So... the Hunt is on.
My fridge... is in my kitchen (duh) The only source of water in the kitchen is the Tap for the sink. (duh... right?)
Naturally, the Logical thing I would think is to run this little tube through the bottom of the cabinets (like the dishwasher hoses...) and tap into those pipes. Well, I look at the kitchen sink pipes... No Saddle valve.
Naturally, the Logical thing I would think is to run this little tube through the bottom of the cabinets (like the dishwasher hoses...) and tap into those pipes. Well, I look at the kitchen sink pipes... No Saddle valve.
I then think to pull out the fridge and follow the line. There's a hole drilled in the hardwood floor of the kitchen, with the white plastic waterline. This makes a bit of sense...The laundry sink is JUST below the fridge in the basement. The water is fed from the ceiling, its probably tapped right there. I go down to the basement, and sure enough, I find the waterline. But it doesn't tap into those pipes. It routes OVER them, using them for support, and goes across the ceiling joists (and under a few) To where the waterheater is.
OK, I think to myself - They tapped the hose going into the water heater I guess that could make sense. So I get the flashlight out, and start looking around. No saddle valve ANYWHERE. I can't see the plastic hose now because there's duct work all above me. I think to the only other water source, is on the main floor, which is the small bathroom behind the stove on the oppisite side of the main floor. I look at the toilet feed - Nope. Look under the bathroom sink... FINALLY!
OK, I think to myself - They tapped the hose going into the water heater I guess that could make sense. So I get the flashlight out, and start looking around. No saddle valve ANYWHERE. I can't see the plastic hose now because there's duct work all above me. I think to the only other water source, is on the main floor, which is the small bathroom behind the stove on the oppisite side of the main floor. I look at the toilet feed - Nope. Look under the bathroom sink... FINALLY!
So, instead of using 3 feet, or even 6 feet of tubing... Or even 12 feet to get to the water heater... They've routed this thin plastic line through the floor twice, across most of the width of the house and back up into the bathroom.
I was flabbergasted.
Why is the Central Air / Furnace Blower on all the time?
The first thing I will do now, next time I buy a house, is check the Air filter on the furnace.
I swear to you, Our filter looked like a cat had died in the ductwork, turned to dust, and all that dust and hair was stopped by the air filter. It was disgusting. I turned off the Blower, and removed the filter, but the matt of fur was too thick to fit out of the filter slot. It all rolled off like lint from a dryer screen. I had to get the vacuum out and clean inside there for fear of a dark cloud of dead cat and doom blowing throughout my house.
So, Of course the furnace/AC was on all the time - No air was circulating. Hard to cool a house with AIR if there's no Air to start with!!! The A/C went from being on 50% of the time, to 10% of the time, in one day.
Why did I use 70 dollars of electricity in the first week of owning my house?!?
I started looking around at culprits.
Having the A/C on 90% of the time because a clogged filter was a good start...
I started looking at the light fixtures. Many of them had 3, 100 watt Old-school incandescent bulbs!
Some of these light fixtures had 3 or 5 50 watt halogen bulbs. These suckers put out so much heat, the A/C was fighting them to cool the room!
WHY did they need to have 500 watts of lighting for a foyer?
I replaced the light with a fixture that has 2, 14 watt bulbs in it. Yay for a 472 watts savings!
Moral of these stories:
These moments usually result in an evenings work to fix. They're usually not urgent... They're just things that will bug you, every time you see them.
I've had at least a dozen of these moments. Probably more. As I encounter more I'll be chronicling it on here, with photo's, Both on discovery and how I fixed it.
I've had:
- Dimmer Switch Failure, (Light stuck on...)
- Multiple Light fixtures burn, smoke and melt
- Lights hanging from electrical wires in garage
- Shelving units pull out from walls
- Recessed Plugs you can't use
- Massive gap under bathroom doors... (awkward...)
- No bathroom fan upstairs
- Clogged bathroom fan
- Broken/tapes up Vents
- Fridge Leak water/blow up
- Furnace starting issues
- Pool issues (aka figuring it out how a pool works on my own...)
- Light fixture replacement
- Electrical sockets underneath Tap of laundry room sink
- No electrical sockets in hallways
- Birds-nests of cable TV wires
- Fuse Panel replacement
- The Extension cord(s) of doom, powering my backyard pool from a plug inside the garage.
I honestly didn't know how many things had gone wrong in 3 months until I counted all this. Its kind of fun (for me) to work on our house. Its something to do that is constructive, rather than wasting away in front of a computer/PS3 like I'd do with apartment living.
So, if your house isn't new, and someone else has meddled with it in the past, you will most likely have a few of these "What the hell?!...." moments where you're scratching your head in confusion and frustration.
Keep in mind, My house was built in 1978. If you thinking of buying a century home and either:
- Aren't handy
- Don't have some extra income to spend
Don't do it!. Stick with a newer home.
The GOOD news is, Most of these things can be figured out and fixed in an evening, with relatively inexpensive trips to Home Depot. They're challenges, But we'll get through them.
So all this being said... time for another disclaimer.
I am not an Electrician, a Plumber, a Contractor, or certified in any way.
If you take any advice I have on this blog, You are 100% responsible for the outcome. Do your research before tackling any project. I'm just here to say, "It has been done, and here's how I did it." Moral support, I suppose.
Before I tackle a project, I:
- Research
- Inspect
- Research again,
- Call around for quotes to get it fixed
- Realize I can't afford to pay someone to fix it
- Research YET AGAIN
- Make sure I have the tools to fix it
- Call my dad for advice (Research)
- Go to home depot, Ask them for advice/tips (sometimes taken with a grain of salt, if its some 16 year old kid who's piped up)
- Warn my Fiancee'
- Start the project.
So, Consider this Blog Point 1. (or maybe point 3)
Next post, is about how to Move a fishtank (the right way)
Friday, November 2, 2012
Moving done... Not the hard way. (it's never easy)
Getting Ready to move:
This is a long post - Fittingly as this will be one of the LONGEST days of your life.
Before I get started:
If you have a fish tank greater than 20 gallons - MOVE IT BEFORE, OR AFTER MOVING DAY. NEVER. EVER. even THINK you can move a big fish-tank on the same day as moving day. (ask me how I know this...) Even though it will only apply to 1% of the population, I'll be doing a separate post on this.
Packing:
Do yourself a favor - Get a bunch of the SAME sized boxes. And a few sharpies. (You'll lose/accidentally pack some of them)
Pack EARLY.
Don't be one of those people who decide to pack on Moving day.
If you're one of those people, everyone hates you.
Yes. YOU.
Back on topic:
As you pack boxes, Label the Top, and at least one side of the box with what is in it, and what room you would like it to go in at the new place. The labels let you find stuff in a pinch and stop the millions of "where does this go?" questions when you're moving it in. I also marked any heavier boxes with a big H.
Good labeling also allows you to prioritize if you bring the box yourself, or if its sturdy enough to be thrown around by your minions (a.k.a. friends) and the moving truck.
Examples:
"Books - Upstairs Purple room"
"Nerdy trinkets and stuff - Banished By Fiance' to Basement Storage - FRAGILE"
"Pillows. Upstairs hall by closet. Feel free to throw at someone"
(I enjoy putting funny comments on boxes. Lets face it, those who are helping you move probably are NOT having fun.)
I also used painters tape and labeled the furniture.
Make a Moving Kit:
You may remember in a previous post I said to make a "moving kit"
I've moved myself 4 times now since leaving home. The first time was wildly disorganized but thankfully I barely had anything to move. Each sucessive move got easier and more organized.
I largely put this towards my "moving kit"
My Moving kit allows me to do 4 basic things:
Eat, Clean, and Sleep, and Repair/assemble
Eating:
Some Random Tips:
Moving Help:
This is a long post - Fittingly as this will be one of the LONGEST days of your life.
Before I get started:
If you have a fish tank greater than 20 gallons - MOVE IT BEFORE, OR AFTER MOVING DAY. NEVER. EVER. even THINK you can move a big fish-tank on the same day as moving day. (ask me how I know this...) Even though it will only apply to 1% of the population, I'll be doing a separate post on this.
Packing:
Do yourself a favor - Get a bunch of the SAME sized boxes. And a few sharpies. (You'll lose/accidentally pack some of them)
Pack EARLY.
Don't be one of those people who decide to pack on Moving day.
If you're one of those people, everyone hates you.
Yes. YOU.
Back on topic:
As you pack boxes, Label the Top, and at least one side of the box with what is in it, and what room you would like it to go in at the new place. The labels let you find stuff in a pinch and stop the millions of "where does this go?" questions when you're moving it in. I also marked any heavier boxes with a big H.
Good labeling also allows you to prioritize if you bring the box yourself, or if its sturdy enough to be thrown around by your minions (a.k.a. friends) and the moving truck.
Examples:
"Books - Upstairs Purple room"
"Nerdy trinkets and stuff - Banished By Fiance' to Basement Storage - FRAGILE"
"Pillows. Upstairs hall by closet. Feel free to throw at someone"
(I enjoy putting funny comments on boxes. Lets face it, those who are helping you move probably are NOT having fun.)
I also used painters tape and labeled the furniture.
Make a Moving Kit:
You may remember in a previous post I said to make a "moving kit"
I've moved myself 4 times now since leaving home. The first time was wildly disorganized but thankfully I barely had anything to move. Each sucessive move got easier and more organized.
I largely put this towards my "moving kit"
My Moving kit allows me to do 4 basic things:
Eat, Clean, and Sleep, and Repair/assemble
Eating:
- Plates (Disposable)
- Cups (Disposable)
- Spoons (Disposable)
Cleaning:
- Roll of paper towel
- Broom/swiffer
- Vacuum
- Duster
- Windex
- Lysol
- Bleach (Toiliet/bath cleaner)
- Shower curtain (if needed.second life as a somewhat expensive floor protector from wet shoes)
- Magic Eraser
- Cardboard box "Rug" for entrances
- Masking tape
- Toilet paper roll(s)
Sleep:
- Blow-up Bed
- 2 sheets
- blanket
- Pillow
- Toiletries (soap/shampoo, toothbrush etc)
- Change of clothes
Repair/Assembly:
- Adjustable wrench
- Channel locks
- Pliers
- Plastic Baggies (for screws/parts etc)
- Sharpie Marker
- Tape Measure
- Level
- Hammer
- Nails
- Screws + drywall plugs
- Drill With Drill bits and Driving bits ( or a bunch of screwdrivers)
- Towels/blankets (to avoid scratching floors/products when assembling)
- Little felt sticky pad things to stop chairs/furniture from scratching your floors
- Rope
It'll take about half a car load to bring all this, but it is definitely one of the first things you should bring.
This kit will really cover you for anything unexpected:
Examples:
- Taking off door hinges to fit that massive couch through the front door.
- Putting together a bed frame.
- Keeping unused screws/pieces with their respective parts
- Hanging items before furniture gets in the way makes it a PITA.
- Cleaning before and after you move.
- Spend the night, Take a nap
- Feed the masses if you order food. (and to clean up after them...)
Some Random Tips:
- Get good quality Packing tape. One strip of good stuff does a better job than 5 strips of dollar store stuff. Ultimately it is cheaper (particularly if you steal a roll from your workplace's warehouse. ... Not saying I did that... of course....)
- Stack all your boxes in some sort of chronological order - The easiest stuff to get to will be unpacked from the truck LAST, as it is first to go into the truck
- Pack your "moving kit" first, but leave the boxes open. You'll still need some of the stuff when you're packing/living at the old place. Just make sure to return everything to those boxes when you're done using them!
- Really try and have at least a week of dual possession if you can afford it/swing it. it makes everything SO much easier. Of course, this is out the window if you're moving a great distance.
- Your friends... are your friends! Not professional movers. (unless they're my friends, who have helped me move 4 times now...) Document well, and guide well, or someone else will take charge and "try" and "help". (If you're well organized, Nobody will think your bossy, ordering everyone around. They'll just think your on top of your shit and complement you on the "easy" move when its all done.)
- With dual possession you can move all the small and breakable stuff yourself. You can also paint a room or two before the stuff moves in.
Moving Help:
Too much help is possible:
If you're moving from an apartment, I found the following amount of help to be the maximum that is useful. Any more, and people just start talking and getting in the way:
you need 7 People. 2 "Leaders" and 5 Minions.
- 1 "Truck Packer" Leader - Stays in the truck, packs items in that the 2 bottom minions bring.
- 2 "Elevator Unloader" Minions - Stay at the Bottom, unloading the elevator into the truck
- 1 "Elevator Ferry" Minion - Simply brings the elevator up and down (Muscles not required)
- 2 "Elevator Loader" Minions - To grab stuff from the apartment and load it into the elevator
- 1 "Apartment Leader" directs things up at top, what to grab. Listens to Truck Packer.
The Tuck Packer runs the show. He and the apartment leader should be in constant communication. The Truck Packer has a tough job into making everything fit snugly, without over-packing or under-packing. Over-packing leaves too much room in the truck, causing things to slide around and damage themselves. Under-packing means you'll be doing another trip, or removing everything and re-packing. As Such, the Truck Packer needs updates on How many Big Items are left, How many boxes, and how many awkward items (plants, stands, Non-stackable things, etc) are left. I'd recommend the Truck packer to be You, the home owner, as you know best what you own. The truck packer needs to have muscles though!
The person running the show upstairs is not really moving a bunch of stuff, so if you have a wife/girlfriend/fiancee, she'd be excellent in that role and will feel very helpful in doing so.
If there's a petite girl handy, Throw her in the elevator. She's the "elevator ferry" (aka "Elevator Fairy" ... See what I did there? ;-) )
That's it for the help. Now... Moving day!
Moving day events (more or less):
- Get Truck EARLY. Early moves will make your friends hate you... but they are vastly superior in EVERY WAY. (Its cooler outside, less busy on the roads, and no BS with the truck rental company about overbooking, as you're the first rental of the day)
- Chase landlords to put elevator on service, which they always forget to do.
- Wait for half of your friends to arrive, which is usually always 30 minutes after you asked them to arrive
- Move stuff into truck
- Forget to tell landlords to take the elevator off service
- Drive to house
- Unload stuff.
- Return truck.
- Inspect old apartment and turn in keys if needed.
- Unpack your Bed, Bedding, pillows. Make bed. (trust me... this should be the first thing!)
- Position couches, Unpack Kitchen basics.
- Drink Beer, order pizza for friends.
- You Idiot! Your probably tipsy because you've had nothing but a Tim Horton's donut and a coffee all day, and have been working hard and are dehydrated. Eat a few extra slices of pizza.
- Thank everyone, but kick them out before dark.
- You need time to clean up the place and get the dirt off the floors, as they'll ruin the floors if you walk on dirty/sandy floors.
- Fall asleep in your nice, made, bed. Turn on fan or something with white noise. You'll sleep better as its familiar, vs. spooky unknown house noises.
That outlines pretty much every one of my moves!
Summary:
- Label/scribble content of boxes
- Get similar sized boxes
- Pack early
- Make a moving kit
- Get the right amount of help
- Only bring out the Beer & Pizza once the truck has been unloaded. (This one is key... ask me how I know this...)
Moving is probably one of the most physically and mentally exhausting days of your lives.
Not only are you just moving everything you own, but you're also going through one of the most dramatic changes to your lifestyle you can make - Almost EVERYTHING in your life changes when you move.
Sleep well. Soon your dreams will be full of nightmares like Leaky roofs, Natural disasters, and broken down appliances. (Or maybe not. I could just be the only weird one that dreams of such things)
Wednesday, October 31, 2012
1-10 Home Buyers Cheat Sheet
So, You've read all the posts so far...
Or you were lazy and just want the Coles notes version.
This is the cheat sheet!
Being a computer nerd, I will eventually be making something called a Critical Path Chart, as well as a Visio Diagram for process flow. For the non nerds, here's a quick itemized list, with links to further details from posts earlier in this blog.
Research and Prep:
- Decide if home ownership is right for you.
- Do some self Budgeting, determine a monthly mortgage payment that is approx 60% of your "spare" income (40% is for Utilities, maintenance, Taxes, Insurance, and savings)
- Contact a Realtor in the area you want to buy.
- Have Coffee with Realtor (hopefully his/her treat ;-) ) To discuss the process of finding a house
- Contact a "Mortgage Guy" and your bank, "Investments guy" for Down-payment advice, mortgage advice and pre-approval
- Make a list of things you want in your future house
- Go See some houses in your price range (3 is recommended. Open houses are fine.)
- Have your dreams crushed because you can't afford a dream house you stumbled into by accident
- Build a REALISTIC list of things you need in a future house
- Get a few (3,000-6,000) ready in case you need to jump on a property
- Obtain pre-approval from mortgage guy
- You are now ready to "jump" at the RIGHT house
- Look at some more houses
- Make an intelligent offer on a house with your three critical conditions
- Enter "the tango" of offers and counter offers
It's Go Time (Example using 90 days to closing/posession date)
- Accept an offer or counter offer
- Call Lawyer, e-mail or fax Signed offer
- Give your Realtor the Deposit (Bank draft/certified Cheque) (a few thousand dollars or more, depending on value/neighborhood)
- Call Building inspector. Book ASAP. (Inspection within the next day or two is ideal)
Within a week of accepting offer: (T-Minus ~85 Days) :
- Get Building inspection
- Confirm Financing
- Waive Conditions, OR go back to negotiation table if something isn't right. (go back to step 15)
- Check with lawyer, Make sure they have mortgage details from mortgage guy, Purchase details from Realtor.
- Book Moving Truck/service
- Give 2 Months notice to current landlord
- Book Moving elevator (if required)
- Look into Utilities at new place, Create new accounts for utilites you don't currently use
- 2 months prior to closing, Call Existing utilities if you have any, to cancel accounts
Approx 1-2 Months from Closing Date:
- Start packing
- Ask to see the house to take measurements for your couches. (make sure they fit down stairs) (Also to make sure they're taking care of your new house)
- At least 1 month ahead, Inform insurance companies of move for Auto rates
- Obtain House insurance effective Move in Date. (don't forget any jewelry, expensive bicycles, etc)
Approx 3-4 Weeks before Closing Date:
- 2 Weeks prior to Closing, Chase up lawyer. Get a status update. Most of the lawyer stuff happens now
- Get Down Payment Bank Draft, Run to Lawyer with it.
- Double-check with utilities that everything is honkeydorey. (Installation dates, billing, etc.)
Less than 1 Week before Closing Date:
- Go into lawyers office a few days prior to closing to sign off all the ridiculous amount of paperwork
- Create your "moving kit" Generally paper towel, screwdrivers, Masking Tape, Styrofoam cups, Paper Plates, Plastic cutlery. Air Mattress, Sleeping Bag, Pillow, Various Cleaning supplies, Vacuum cleaner/Mops. (This allows you to clean before furniture gets in, and it also allows you to eat/drink when you order pizza because they're no food in the new place)
Closing Day!
(...Assuming you actually got sleep last night and some energy, now is an appropriate time to do the happy dance)
- Get called from the lawyer late afternoon, and run there, as fast as you can, to excitedly pick up the keys to your new house. Don't get a speeding ticket.
- Speed to your new house.(Don't get ANOTHER speeding ticket)
- Take a corny photo of yourselves standing beside the SOLD sign.
- Promptly post above Photo to Facebook. (optional)
- Get inside and do a mini inspection. Make sure all the appliances included are working, and that there is no substantial damage that was clearly not there during inspections/viewings.
- Turn on the fridge if off. Insert Beer. It'll be needed on moving day. (after the move, of course... you want your stuff INTACT.)
- Probably spend the night Cleaning. Crash at 3:30am on air mattress, wake up, late for work and speed there. (they'll understand...)
The following 3 days:
- Drop off/mail things like Cable modems, PVR's, Sat. equipment of your old house to the appropriate provider
- Change your addresses on your license, Health card, Outdoors card, Transferred utilities, Visa/Bank items, Magazines, etc.
- Internet/TV installation By Utilities. Be home for this as they screw up EVERYTHING!!!
- You might want to look at mail forwarding from your old address. I think its about 100 bucks for a year. (didn't do this myself)
- Final bits and pieces and packing for Moving. Bring your breakables in your own car.
- Also, Bringing Microwave and some alphaghettis/Frozen dinners may be a good idea. Eating McDonald's or Pizza 4 days in a row is awesome, but horrible. (Thankfully it takes weeks for scurvy to set in)
There will be many more posts! I've covered the very basics of buying a home... But Owning a home is a whole other world of hurt. (I meant to type joy... really.)
I will also be posting about the smaller details of buying a house, and things to consider. (Like Taxes... Insurance... Age of houses...)
If you find this blog informative, Please let me know in the comments! It takes a TON of time to write.
Now I will be also posting about my personal experiences, and eventually this will turn into a DIY First Time Homeowner's Blog. A lot of life lessons have already been taught, so the posts will be frequent. I think it'll be at least a month before I convert to weekly posts instead of every other day posts!
Regarding the ads, I've screened them to only show ones related to my content, so there will be some useful ads Mortgage Calculators, Banks, inspectors, Realtors, etc. Don't be afraid to click on them. Right now I've made a whopping 6 dollars for over 15 hours of writing time... which equates to 40 cents an hour. *sadface*
Its a labour of love!
Also, if there are requests or questions, I'll either answer them in the comments, or if the question is "loaded" enough, it'll feature its own blog posting!
Hopefully I make a few regular readers!
The next post: How to make your move go smoothly.
Monday, October 29, 2012
10. Closing Costs and Legal Stuff
So, at this point, you've accepted the offer, you've waived your conditions and its a done deal.
The Lawyer and your Realtor handles Most of the legwork.
There are a few points in which you have to hand over hard earned Moola:
1. Deposit
$2000-$6,000 ($10,000 max)
When an offer is accepted, there is a deposit. This surprised me, and nobody told me about this. Generally this deposit is a few grand. Mine was 3,000 bucks. Depending on the value of your house, and how affluent your new neighborhood is. This Deposit can vary from 1,500 to 10,000 bucks. (wide range, I know... but good news! It is considered part of your Down Payment!)
The Deposit is usually required within 24 hours of the offer being accepted. Because it caught me off guard, it caused me a lot of stress - I don't typically have Three big ones sitting around that I can access instantly. In Hamilton, deposits are generally cheaper, but I know in Toronto they're usually a bit more. Ask your Realtor what you should have on hand.
We dropped off a bank draft to our Realtor, and he ran it over to their realtor who held onto it until closing I believe. If you invoke one of your conditions and walk away from the deal, you get this bank draft back. It's only "cashed" once you take possession.
2. Building Inspections
$350-450 (and higher, for large houses)
These are required by ME. $400ish. Don't even think about skipping this. Don't get your buddy or dad to do it (unless he's VERY qualified and does it for a living) Just TRUST me. Its 400 bucks, and in the grand scheme of things, you won't really notice that expenditure. It saved my bacon, It could save yours. Most Inspectors will take a personal cheque, due at the end of the inspection. There's typically tax on this. You might be able to get a cash discount, but I'd be slightly wary of those offering a cash price.
3. Lawyers fees and adjustments
1,250 - 2,000 + Adjustments (Adjustments can be 0-$3500, sometimes included in mortgage amount)
So the lawyer does a lot of work, and also seems like very little work. All the paperwork is stupidly complicated and wordy, and when you go to sign all the paperwork (probably a few days before closing) you better bring a hot/cold pack for your hand... - SO MANY SIGNATURES!
The lawyer will charge you for retarded things like staples, photocopies, Faxes, Mail/postage, paper, etc... On TOP of their hourly/flat rate which you hopefully negotiated before hiring them. My lawyer was awesome because we did almost everything via scans and e-mails. I'm pretty sure this saved me some money and it definitely did save me time. Try and find a "younger" lawyer as they are generally more tech savvy. Old school ones mean a lot of driving and delivering of documents which is a pain.
The Important things the lawyer does:
I didn't have a heck of a lot of closing cost money at hand (my unexpected $3,000 deposit on offer acceptance tied up those funds) so I opted for the cheapest method of signing up for utilities, although I generally like to pay my bills myself rather than have them take the money directly from my accounts. Alas, because I was caught off guard by earlier costs, it was a necessary evil.
That's it for utilities!
Now, The only other costs are moving expenses. If you were lucky enough to get a closing date in the middle of the month, you may be able to haggle a local truck rental or moving service down a few bucks to make that easier. End or beginning of the month moves are the busiest time, so make sure to book your truck the second you have finalized the closing date (I.E. accepted offer) I'd budget 200 or more for a 32 foot moving truck (if you have lots of furniture) or if you're moving from your folks place, A 16 footer cube truck/van will do it. If you're still living at home, you might be able to get by with a buddy's pickup truck and a few runs with your own car (for boxes) When I first moved out, I actually moved a 6 foot Birch Table, 5 chairs and a few boxes in my Mazda3 Sedan! (granted, it took some creative angles, dis-assembly and awkward seat positions... but I did it!)
This post was largely boring, but It was chalked full of information. Hopefully it helps you along!
The next post will be an overall summary (shortened) about the home buying process. If I'm not lazy, I might even have a flowchart of the process. (but we'll see!)
The Lawyer and your Realtor handles Most of the legwork.
There are a few points in which you have to hand over hard earned Moola:
- Offer Acceptance - Deposit
- Building Inspection
- Lawyers Fees & Adjustments
- Utility Hookups (Deposits)
1. Deposit
$2000-$6,000 ($10,000 max)
When an offer is accepted, there is a deposit. This surprised me, and nobody told me about this. Generally this deposit is a few grand. Mine was 3,000 bucks. Depending on the value of your house, and how affluent your new neighborhood is. This Deposit can vary from 1,500 to 10,000 bucks. (wide range, I know... but good news! It is considered part of your Down Payment!)
The Deposit is usually required within 24 hours of the offer being accepted. Because it caught me off guard, it caused me a lot of stress - I don't typically have Three big ones sitting around that I can access instantly. In Hamilton, deposits are generally cheaper, but I know in Toronto they're usually a bit more. Ask your Realtor what you should have on hand.
We dropped off a bank draft to our Realtor, and he ran it over to their realtor who held onto it until closing I believe. If you invoke one of your conditions and walk away from the deal, you get this bank draft back. It's only "cashed" once you take possession.
2. Building Inspections
$350-450 (and higher, for large houses)
These are required by ME. $400ish. Don't even think about skipping this. Don't get your buddy or dad to do it (unless he's VERY qualified and does it for a living) Just TRUST me. Its 400 bucks, and in the grand scheme of things, you won't really notice that expenditure. It saved my bacon, It could save yours. Most Inspectors will take a personal cheque, due at the end of the inspection. There's typically tax on this. You might be able to get a cash discount, but I'd be slightly wary of those offering a cash price.
3. Lawyers fees and adjustments
1,250 - 2,000 + Adjustments (Adjustments can be 0-$3500, sometimes included in mortgage amount)
So the lawyer does a lot of work, and also seems like very little work. All the paperwork is stupidly complicated and wordy, and when you go to sign all the paperwork (probably a few days before closing) you better bring a hot/cold pack for your hand... - SO MANY SIGNATURES!
The lawyer will charge you for retarded things like staples, photocopies, Faxes, Mail/postage, paper, etc... On TOP of their hourly/flat rate which you hopefully negotiated before hiring them. My lawyer was awesome because we did almost everything via scans and e-mails. I'm pretty sure this saved me some money and it definitely did save me time. Try and find a "younger" lawyer as they are generally more tech savvy. Old school ones mean a lot of driving and delivering of documents which is a pain.
The Important things the lawyer does:
- Makes sure there aren't any Liens (debts) against your house. (Taxes, Municipal utilities, Work orders etc)
- Makes sure that you're actually getting what you think you're getting. (my property is actually two "lots" so our lawyer made sure we were buying both of them. It also cost us 150 bucks more because they had to get two detailed maps from the city of Hamilton of the plots to ensure things were proper.
- Handles the money. You give your massive down payment cheque to them. They also deal with your Mortgage company to secure the Draft. They also deliver it to the sellers lawyer. (I think electronically)
- Will handle any major issues if there are any.
- Title Insurance - Basically, if anything goes horribly wrong, title insurance will cover you. This allows the lawyer to spend less time digging up all the dirt on your house, and more time creating paperwork for you to sign ;-). Title insurance basically covers you from any hidden stuff arising from the grave and biting you in the ass. (Heres a government PDF that explains it in more detail)
- Adjustments - If the current owners have paid the full years taxes, you'll have to pay them back for the unused portion. This also includes things like Hot water tank/furnace/A/C rentals if any.
- Answering questions about Process (hopefully I've helped with this, because a lawyer is an expensive person to ask questions to!
Adjustment fees can vary greatly, particularly at the beginning of the year if the owners have paid their taxes up front, you'll have to pay them back. The good news is that the lawyer can usually include this into your mortgage. That about sums up what the lawyer will ask for!
4. Utilities
$500-$2,000 dollars
2 months (if you can) before you take possession You should find out what utility companies service the new house. If any are in common with what you are using now, you might be able to save some money on deposits.
You need 2 months because some evil utility companies can require this much notice to cancel an account. If you Cable TV/Internet and are locked in a contract, and they don't service your new area, you'll be in for a heated battle, but will probably have to pay a $200-300 cancellation charge per service ( TV, Internet etc) Sometimes they have a grace policy if you're moving to an area out of their service range. (cross your fingers!) If you're lucky that they do service your new area, let them know of the closing date so they can kill service to your current residence and move you to your new one.
New Utility Companies
Most utility companies like to have a deposit when dealing with a new customer. This way if you turn out to be a deadbeat, they can cancel your service before you eat through your deposit, keeping them from running in the red. Some will waive or reduce this if you agree to Pre Authorized Billing or direct withdrawal.
My Deposits:
Horizon (Water and Power) - 370 dollars, collected in 3 payments over first 3 bills. Refunded as credit after 12 months
Reliance (Hot Water Tank) - 35 dollar setup fee
Source Cable (Internet/TV) - 35 dollar setup fee, Zero deposit because I agreed to Pre Authorized payment
Union Gas (Natural gas) - 0 Dollars, No Deposit if you sign up for Equal Payment Plan AND Pre Authorized Payment (otherwise I think $300)
I didn't have a heck of a lot of closing cost money at hand (my unexpected $3,000 deposit on offer acceptance tied up those funds) so I opted for the cheapest method of signing up for utilities, although I generally like to pay my bills myself rather than have them take the money directly from my accounts. Alas, because I was caught off guard by earlier costs, it was a necessary evil.
That's it for utilities!
Now, The only other costs are moving expenses. If you were lucky enough to get a closing date in the middle of the month, you may be able to haggle a local truck rental or moving service down a few bucks to make that easier. End or beginning of the month moves are the busiest time, so make sure to book your truck the second you have finalized the closing date (I.E. accepted offer) I'd budget 200 or more for a 32 foot moving truck (if you have lots of furniture) or if you're moving from your folks place, A 16 footer cube truck/van will do it. If you're still living at home, you might be able to get by with a buddy's pickup truck and a few runs with your own car (for boxes) When I first moved out, I actually moved a 6 foot Birch Table, 5 chairs and a few boxes in my Mazda3 Sedan! (granted, it took some creative angles, dis-assembly and awkward seat positions... but I did it!)
This post was largely boring, but It was chalked full of information. Hopefully it helps you along!
The next post will be an overall summary (shortened) about the home buying process. If I'm not lazy, I might even have a flowchart of the process. (but we'll see!)
Saturday, October 27, 2012
9. The "Walk Away" list
As we developed a list of things we wanted, after our first home inspection failed, we also developed a list of things that would make us walk away, no questions asked.:
Our "Walk away" list:
- Mold - Fairly obvious
- Aluminum Wiring - This was popular in the mid/late 70's. Its a fire hazard if not correctly installed, and insurance companies HATE it, and force you to get your wires examined periodically. Basically, if an aluminum wire is bent to sharply, it'll fracture slightly inside. It'll start to corrode (aluminum's version of rust) and will eventually become like a toaster element in your wall, and potentially start a fire. Just Google it
- Knob and Tube Wiring - Again fire hazard, but this is basically un-insulated Wires inside your walls. They're just wrapped around a ceramic disc, nailed into your wall and held tight. Google it as well, but just trust me, its super expensive to replace, and you don't want to tackle this on your first house. If you see it, Run, Don't walk!
- Dirt Crawlspaces - Just more a personal preference - its an easy way for moisture to get into your house. Tons of houses have these, but if your house is the ONLY one in the hood with one (your building inspector will know) then you should avoid it. odds are there were more serious issues.
- Asbestos - Deadly, cancerous insulation. If contained properly, it is OK, but will turn off many buyers when you go to sell. Avoid if at all possible.
- Leaking Basement - Obvious, and expensive to fix. Precursor to Mold.
- Electric/Boiler heat - its just bloody expensive to operate, and expensive to replace with a duct system. Also means No Central A/C is possible. For century homes, (old classic beautiful homes) this is super common. Its not a deal breaker for some, but it was for me.
- Houses where the driveway slopes INTO the garage/house - 9/10 houses will have no problem with this, but my luck would be the one that gets a drain freeze or backup, resulting to a flooded basement. Also, the thought of having some freezing rain on your driveway and not being able to stop as my car plummets through my garage door wasn't appealing. (I actually had a nightmare about this... home hunting does weird things to your sleep...)
- "Handyman" houses - Some people like to THINK they can fix things. (I might be a bit of a Hippocrite here...) But really just bastardize their entire house. Replacing a light switch is one thing, but when someone blows out a basement wall on their own, and runs copper pipes on an outside wall that'll freeze and blow up in the winter... You should run. (true story) Not only did they probably not get permits, it could also be a safety hazard if they did their work incorrectly. When I get to the "DIY home ownership part of this blog, I'll be showing you that I've done all my research and am doing everything to code or greater. (but even then... its "better" to get it done professionally from a liability standpoint...)
So at this point, you are either Running away from your potential house, Or ready to hunker down and take the next step.
Assuming the financing is in order, and your inspection went well enough... its time to waive your conditions.
Waiving your conditions means that all the conditions of your offer have been met. Those Three conditions I recommended (Financing, Visits, and Inspection) are now satisfied, and you are committing yourself to buy the house.
Once you sign this 1 or 2 page Release form... You're buying the house regardless if you like it or not.
THIS is truly the point of no return, So Go back over everything you know about the house, the costs, whats right and whats wrong. Cost out the repairs
If you're good to go... Congratulations, you're 99.9% committed to buying a house.
Your last hurdle is your lawyers job. (the 0.1%)
(Your job is to start fretting over where you're going to put that massive Couch you bought last year that fits perfectly in your apartment. It might not fit down the stairs!)
Next post will be Legal stuff and closing costs. (very important, but also kinda boring. I'll try and make it exciting, I promise)
Friday, October 26, 2012
8. House inspection!
So, they Buyer has accepted your offer/Counter offer, you've signed back, and you think its a done deal.
It's not a done deal.
The Financing shouldn't be a problem, you've been pre-approved. Talk to your "mortgage guy/girl" and send him the offer paperwork. Your lawyer will need this too. (more on the lawyer soon, no worries)
Now is a good time to tell your Mortgage guy the details (send him a copy of the most recent offer), so he can get the ball rolling. Its also a good time to inform your lawyer. (more on this, as well as closing costs, on two posts from now.)
You now have your Conditions.
Not sure if you've ever watched Holmes Inspection (with Mike Holmes)... but Honest to God, It's like you're Sherlock Holmes and Watson going through someones home for clues. Its a little bit creepy, but your curiosity gets the better of you as you snoop through someone elses home.
We used Nook n' Cranny Home inspections (twice!) And Darren was Amazing, and I honestly can't put in words how much grief he saved us! If you're in the Hamilton grimsby/Burlington (maybe even oakville) area, He's the man to call.
We "bought" that house after 5 offers/counteroffers just to have the building inspector find a bunch of glaring issues with it that caused us to invoke our inspection condition/clause and walk away. Our Realtor didn't see the issues as a big deal, But It was a tough decision that left Megan Crying, She and I arguing, and me feeling like I had stepped on and killed a 4 year olds' 12 week old puppy. Ultimately, You have to realize that A Steady, Monthly Mortgage payment is one thing, but $10,000 dollars to fix a leaking, moldy basement is another.
Ultimately, I knew Megan was just invested emotionally to getting a house. There would be others, and she would see this (and she did) I "pulled rank" on Megan and walked away from a VERY expensive potential mistake. (She did eventually forgive me... I think.)
(By "pull rank" I pulled the "But I'm the one who's going to have to fix all this, and we're going to have to delay our wedding to afford to fix all this")
Other than the issues with the house, another thing our inspector did was look at the listing vs. what was actually at the house, to ensure it was accurate. It said Vinyl Roof on the listing - Nope. It had a nearly worn out Shingle roof. No idea where vinyl came from. (vinyl roofs generally are down south, but are not great for cold climates - they get brittle) There was a bathroom fan, at chest height, In the wall of shower!!! (electrical hazard much?) it also said all new windows. Maybe 50% of them were "newer".
And the Mud icing to the cake: A dirt Crawlspace, which was mud, covered in a tarp held down with bricks. As an asthmatic, This was the last straw. There was also horrible wiring (main fuse was 15 feet away from the fuse panel... Fuse panel rated for 125 amps, Main fuse rated for 100 amps, and also it was broken with no cutoff switch... just exposed, 100 amp wires asking for someone to kill themselves on...
So really... Just a lot of money to be spent that we didn't have.
Now, Look at the issues he found, vs what we saw in the house:
The house was cute, showed well and looked updated. it had potlights, new carpets, nice hardwood floors, a new fireplace, nice gardens and a beautiful backyard.
The Inspector's job is to look past the pretty clothes, and look at body of the house. When I put it that way, it sounds like a glamours job... But its not. Lots of crawling around in attics, Dank Basements, Hot roofs, electrical hazards. Darren was kind of like the Steve Erwin (Crocodile hunter) of House inspections, Finding all this dangerous and costly stuff you wouldn't have ever dreamed of catching.
He did this VERY well, and what Megan and I couldn't see, He did. He showed me everything I NEEDED to see, even if I really didn't want to. I sat down with him and I told him the price, and I asked his honest recommendation as to if this house was worth it. He said walk, so I did.
Listen to your inspector. They are the only person who are 100% on your side and can always be trusted. You pay them ($350-$450) regardless if you get the house or not, so they have NO ulterior motives to cover anything up. (and for that reason, I'd recommend find your own inspector (or use Darren), rather than one the seller (or even your Realtor) recommends)
Its pretty much mandatory to go with your inspector when he does this. Its not very often you have a super knowledgeable person to go through your house and show you how it works. He'll show you your Furnace How it works, A/C, things that you should look at replacing fairly soon. Safety items, etc. He'll give you a Report at the end of it all, Prioritizing various issues. The big one for us on the house we bought was the electrical panel and retaining wall. After some research, we saw that the panel was 800 bucks to replace, and the retaining wall was owned by the people behind us, so if anything ever happened regarding it, it would be a pain int he ass, but we wouldn't be liable, they would (its a case of "we were here first!")
BEST 350-400 dollars you will ever spend. Trust me.
If a seller refuses your Inspection clause, Walk away. They're hiding something.
So, if your inspector found a few small issues, but you still want the house... You have two options:
Continue the Tango (Counter offer), or just buy the house as it is.
If you decide to counter offer (again!) Know that the seller can then at that point take in other offers. You are Killing off your current offer on a condition, so your agreement to buy the house is now void. Get the details from your Realtor and find out if they have any other people interested in the house. If nobody is in line, you are "more safe" you can use your inspection clause and make a counter offer, but there's always the chance someone could slip in, resulting in someone else now owning "your" house.
With our current house, the inspector discovered the rear side of the roof is fairly worn. The front looks perfect. It'll have to be replaced in the next few years. Between that and the bad electrical panel we invoked our inspection condition and pulled our offer to knock $5000 dollars off the asking price. They countered with $2500, and we accepted. Its not the cost of a new roof, but every bit helps. We didn't want to push our luck, because we knew we were the first ones in line, and other people wanted to buy "our" house.
The knowledge that the current owners needed to move ASAP allowed us to haggle a bit more. If we Pushed our luck too much, The sellers could have shut the door on us and gone with the next offer in line, since we technically invoked our Inspection clause to try and haggle more for the cost of replacing the roof and electrical panel. We gambled, and won.
Bottom line: Get a house inspection. Really, you're spending a quarter million dollars. 400 bucks for an inspection is NOTHING compared to the world of hurt you could be in if you miss something critical.
Next post: Houses to "walk away" from.
Subscribe to:
Posts (Atom)